Python Virtual Environment: A comparison of venv, pyvenv, pyenv, virtualenv, virtualenvwrapper, and pipenv
To maintain consistency and avoid challenges between different projects, you need to manage dependencies and isolate their project environments. Virtual environments solve this problem by allowing dependencies to be installed in isolated environments without affecting the Python installation system-wide.
We'll compare venv, pyvenv, pyenv, virtualenv, virtualenvwrapper, and pipenv for creating isolated Python environments. Venv and pyvenv are built-in to Python, while virtualenv offers additional features.
pyenv manages Python versions, virtualenvwrapper simplifies environment management, and pipenv integrates dependency management. By the end of this comparison, you'll have a clear understanding of which tool suits your development workflow.
- Difference between Global and Virtual Environment
- What is Python Virtual Environment?
- Why Python Virtual Environments are used?
- Detailed Overview of Each Tools
- How to choose the Right Python Virtual Environment Tools?
Difference between Global and Virtual Environment
Both global and virtual environments are used to manage dependencies and isolate project environments, but they serve different purposes.
1. Global Environment
- When you install Python on your system, it comes with a default global environment. This environment contains all the packages installed using the system's package manager (e.g., pip or conda) and is accessible by all Python projects.
- Packages installed in the global environment are available system-wide and can be accessed by any Python script or application running on that system.
- Installing packages globally can lead to conflicts between different projects that depend on different versions of the same package. It also requires administrative privileges to install packages.
2. Virtual Environment
- A virtual environment is an isolated Python environment that allows you to install packages and dependencies specific to a particular project without affecting other projects or the global environment.
- Virtual environments are created using tools like
venvandvirtualenv. - When you create a virtual environment, it creates a separate directory containing a standalone Python interpreter and a copy of the Python standard library.
- Packages installed within a virtual environment are only accessible to that environment and its associated project. This allows you to have different versions of the same package installed in different virtual environments without conflicts.
- Virtual environments are particularly useful when working on multiple projects with different dependencies or when you need to ensure reproducibility by using specific versions of packages for each project.
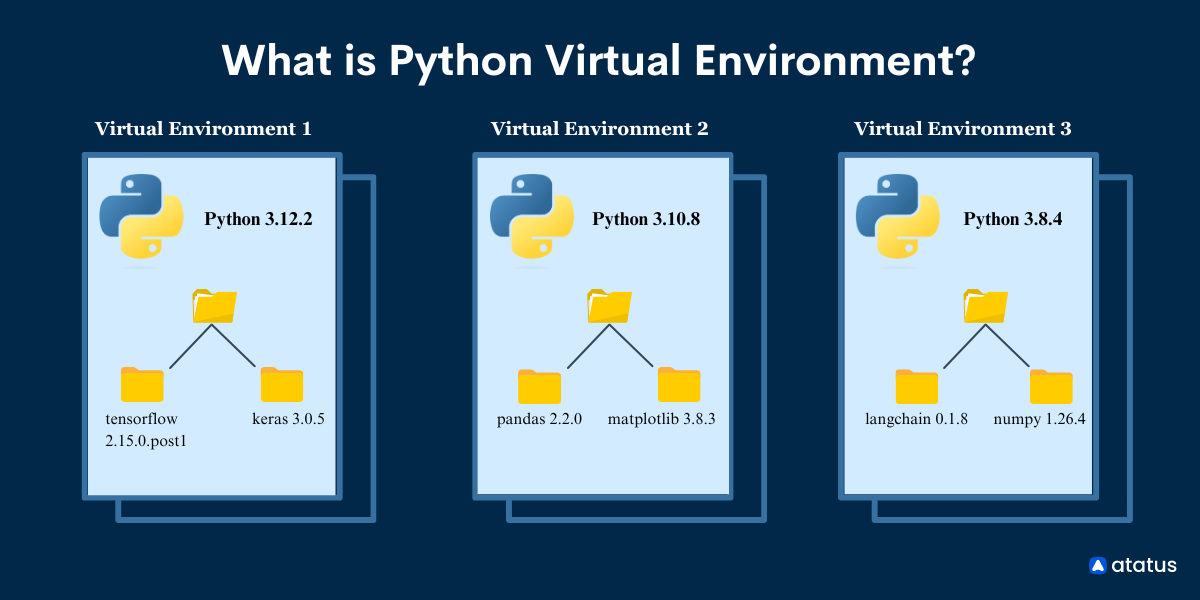
What is Python Virtual Environment?
Python virtual environments are isolated environments within which Python applications can run independently of each other, with each environment having its own set of dependencies and Python interpreters. These environments are created using tools like venv, virtualenv, pyenv, or pipenv.
Virtual environment allows you to work on multiple projects simultaneously without worrying about conflicting dependencies or affecting the system-wide Python installation.
Virtual environments are essential to enable reproducibility across different development environments. They are widely used in Python development to simplify workflow and manage project dependencies efficiently.
Why Python Virtual Environments are used?
Python virtual environments are used for several reasons:
- Dependency Isolation: Virtual environments allow you to install project-specific dependencies without affecting other projects or the system-wide Python installation. This isolation makes sure that each project has its own set of dependencies and preventing conflicts.
- Dependency Management: Virtual environments simplify dependency management by enabling you to define and manage project dependencies separately for each project. This makes it easier to install, update, and remove dependencies without impacting other projects.
- Reproducibility: Virtual environments provide reproducibility by encapsulating the exact set of dependencies required for a project. This enables that the project can be easily replicated and run in the same environment across different machines or by other you.
- Environment Consistency: By isolating dependencies, virtual environments promote consistency in development environments.
- Security: Virtual environments improve security by isolating projects from potential exposure in system-wide packages. This reduces the risk of dependency-related security issues and makes it easier to manage security updates for individual projects.
Detailed Overview of Each Tools
1. venv
Python's venv module is a built-in tool provided in Python 3 for creating lightweight virtual environments. It offers a simple way to create isolated environments without the need for additional installations.
Creating and Activating Virtual Environments using venv:
To create a virtual environment using venv, use these commands in your command prompt:
python3 -m venv /path/to/your/virtual/environmentReplace /path/to/your/virtual/environment with the desired location for your virtual environment. It will create a new directory at the specified location containing the virtual environment.
Once it is created, you can activate it by navigating to the directory where it was created and using the suitable activation command based on your operating system:
On Windows:
/path/to/your/virtual/environment/Scripts/activateOn Unix or MacOS:
source /path/to/your/virtual/environment/bin/activateAfter activation, you will notice that your command prompt or terminal displays the name of the virtual environment, indicating that you are now working within the isolated environment. You can install dependencies and run Python scripts within this environment without affecting the system-wide Python installation or other projects.
To deactivate the virtual environment and return to the global Python environment use the deactivate command in the terminal or command prompt
2. pyvenv
pyvenv was a built-in tool for creating virtual environments in Python, introduced in Python 3.3. However, it has been deprecated since Python 3.4 in favor of venv. The main reason for deprecation is to promote a single, consistent way of creating virtual environments using the venv module, which is simpler and more feature-rich than pyvenv.
pyvenv served a similar purpose to venv, allowing users to create isolated environments with their own Python interpreter and package directories.
However, with the introduction of venv, which is part of the standard library and provides the same functionality with improvements and bug fixes, pyvenv became redundant.
You are encouraged to use venv instead of pyvenv for creating virtual environments in Python 3.4 and later versions. This provides compatibility and consistency across different Python environments and simplifies the virtual environment creation process for you.
3. virtualenv
virtualenv is a third-party tool for creating and managing virtual environments in Python. Python's built-in venv module, virtualenv offers additional features and flexibility, making it a popular choice among you.
Creating and Activating Virtual Environments using virtualenv:
For creating a virtual environment using virtualenv, you first need to install the virtualenv package if you haven't already:
pip install virtualenvAfter installation, you can establish a virtual environment by running these command in your terminal or command prompt:
virtualenv /path/to/your/virtual/environmentReplace /path/to/your/virtual/environment with the desired location for your virtual environment. It will create a new directory at the specified location.
For activation of the virtual environment, navigate to the directory where it was created and use the proper activation command based on your operating system:
On Windows:
/path/to/your/virtual/environment/Scripts/activateOn Unix or MacOS:
source /path/to/your/virtual/environment/bin/activateAfter activation, you will notice that your command prompt or terminal displays the name of the virtual environment, indicating that you are now working within the isolated environment.
You can install dependencies and run Python scripts within this environment without affecting the system-wide Python installation or other projects.
To deactivate the virtual environment and return to the global Python environment, simply use the deactivate command in the terminal or command prompt.
4. virtualenvwrapper
virtualenvwrapper is a set of scripts for virtualenv that improve the management of virtual environments in Python.
It provides a collection of commands and features to simplify the creation, activation, deletion, and organization of virtual environments.
Creating and Activating Virtual Environments using virtualenvwrapper:
Installation: Before using virtualenvwrapper, you need to install it via pip:
pip install virtualenvwrapperSetup: After installation, you need to configure virtualenvwrapper by typing the following lines to your shell configuration file (e.g., .bashrc, .zshrc, etc.):
export WORKON_HOME=$HOME/.virtualenvs
export VIRTUALENVWRAPPER_PYTHON=/path/to/python
source /usr/local/bin/virtualenvwrapper.sh
Replace /path/to/python with the path to your Python interpreter.
Creating Virtual Environments: To create a new virtual environment, you can use the mkvirtualenv command followed by the desired environment name:
mkvirtualenv myenvIt will create a new virtual environment named myenv.
Activating Virtual Environments: Once a virtual environment is created, you can activate it using the workon command followed by the environment name:
workon myenvActivating a virtual environment will change your shell to indicate which environment is currently active, making it easier to distinguish between different environments.
Deactivating Virtual Environments: You can use the' deactivate' command to deactivate the virtual environment and return to the global Python environment.
This command will revert your shell to the global Python environment, allowing you to work outside of any virtual environment.
5. pipenv
pipenv is a higher-level tool designed to simplify and improve Python dependency management and virtual environment creation. pipenv combines the functionalities of pip, virtualenv, and virtualenvwrapper into a single package. It aims to provide an easier way for you to manage project dependencies and environments.
Creating and Activating Virtual Environments using pipenv:
To create a new virtual environment for your project, navigate to your project directory in the terminal or command prompt.
Run the following command:
pipenv installThis command initializes a new virtual environment in your project directory and installs any dependencies specified in your Pipfile (if it exists).
Activating Virtual Environment:
Once it is created, you can activate it by running:
pipenv shellThis command activates the virtual environment and sets up the shell environment to use the dependencies installed within the virtual environment. It will change to indicate that you are working inside a virtual environment now.
Deactivating Virtual Environment:
To deactivate the virtual environment and return to the global Python environment, type:
exitThis command will deactivate the virtual environment and return you to your original shell environment.
6. pyenv
On a single computer, pyenv can manage multiple Python versions. Easily switch between different versions of Python, allowing you to work with specific versions of Python required for their projects.
With pyenv, you can create isolated environments for each Python version, maintaining project compatibility and consistency.
How to install and use pyenv to switch between Python versions:
Installation: To install pyenv, you can use the following command in your terminal:
curl https://pyenv.run | bashThis command installs pyenv via a script provided by the pyenv project.
Setup:
- After installation, you need to add pyenv to your shell's configuration file (e.g., .bashrc, .zshrc, etc.).
- Add the following lines to your configuration file:
export PATH="$HOME/.pyenv/bin:$PATH"
eval "$(pyenv init --path)"
Reload your shell to apply the changes.
Installing Python Versions:
Once pyenv is installed and configured, you can list available Python versions by running:
pyenv install --listThe following command will install a particular Python version:
pyenv install <version>Replace <version> with the desired Python version (e.g., 3.8.12).
Switching Between Python Versions:
To switch to a specific Python version globally, use the following command:
pyenv global <version>
Replace <version> with the desired Python version.
Alternatively, you can set a specific Python version locally for a project directory using:
pyenv local <version>
Verifying Python Version:
To verify the currently active Python version, run:
python --version
How to choose the Right Python Virtual Environment Tools?
Selecting the right tool for managing Python environments is necessary and depends on various factors, including project requirements and personal preferences. Some of the considerations to help you choose the right tool:
a) Built-in vs. Third-Party Tools:
- Consider whether you prefer using built-in tools provided by Python (e.g.,
venv) or third-party tools (e.g.,virtualenv,pipenv). - Built-in tools offer simplicity and ease of use, while third-party tools often provide additional features and flexibility.
b) Feature Set:
- Determine the features offered by each tool and determine which ones are essential for your workflow.
- Consider features such as dependency management, virtual environment creation, compatibility with different Python versions, and integration with package managers.
c) Compatibility:
- Make sure that the chosen tool is compatible with your Python version and operating system.
- Some tools may have limitations or specific requirements based on the Python version or operating system you are using.
d) Community Support and Documentation:
- Assess the level of community support and documentation available for the tool.
- A community and documentation can be valuable resources for troubleshooting issues and learning best practices.
e) Integration with Other Tools:
- Consider how the tool integrates with other tools and frameworks used in your development stack.
- For example, if you are using a specific package manager or development framework, ensure that the chosen tool integrates seamlessly with it.
f) Personal Preferences:
- Take into account your personal preferences and familiarity with each tool.
- Choose a tool that coordinates with your preferred workflow and coding style, as this can contribute to your overall productivity and satisfaction.**
g) Project Requirements:
- Analyze the specific requirements of your project, such as the need for dependency isolation, compatibility with legacy Python versions, or integration with continuous integration/continuous deployment (CI/CD) pipelines.
- Select a tool that best addresses these requirements and coordinates with the project's goals.
Conclusion
Hence, Python virtual environments help manage dependencies and provide project consistency. These are the key points to remember while choosing the virtual environment:
- Virtual environments isolate project dependencies, preventing conflicts and maintaining reproducibility.
- Tools like
venv,virtualenv,pipenv, andpyenvoffer different features and cater to various needs. - Consider project requirements, personal preferences, and compatibility when choosing the right tool
In conclusion, virtual environments support your ability to work efficiently and maintain clean, organized project environments. Whether using built-in tools or third-party solutions, adopting virtual environments is essential for successful Python development.
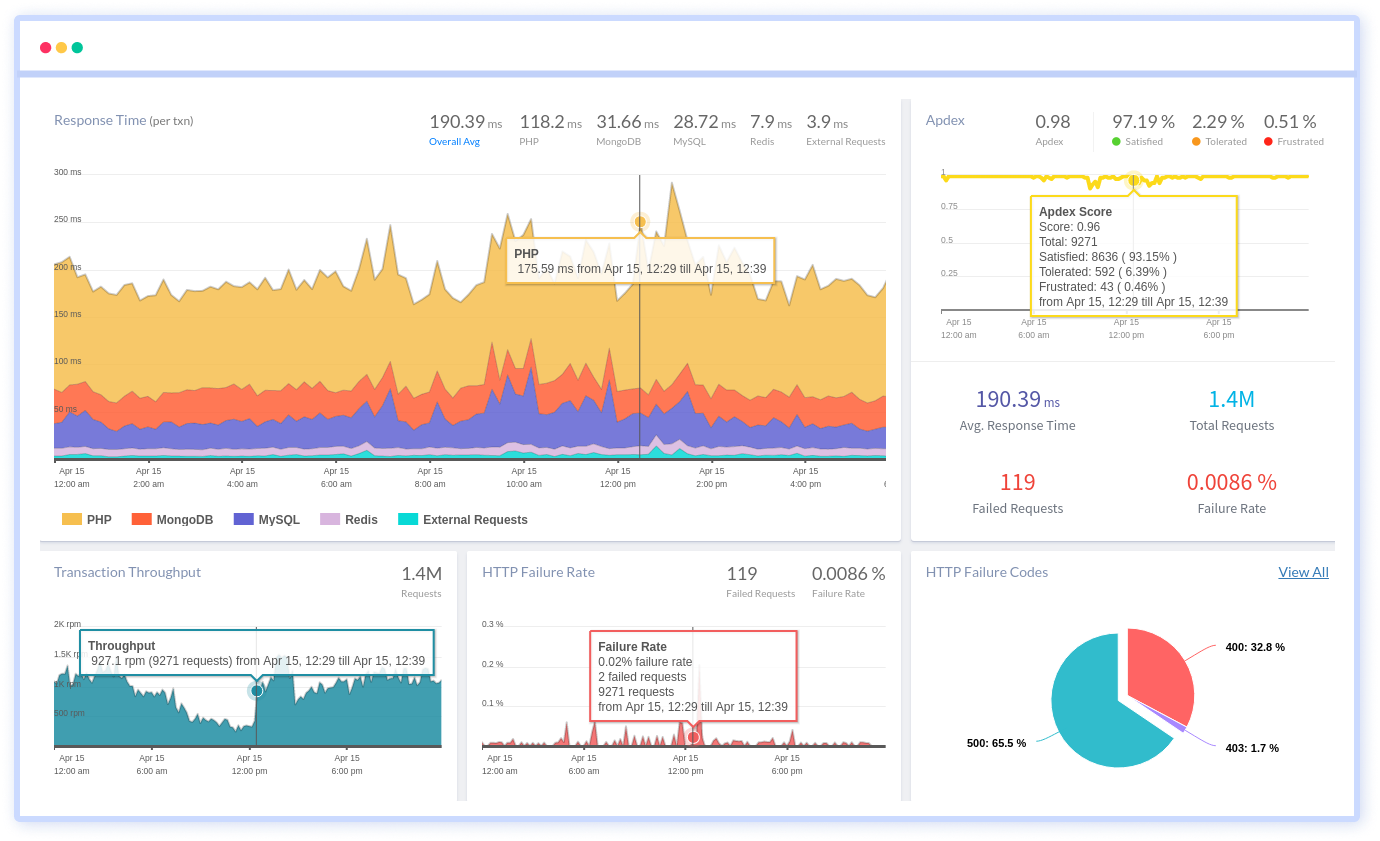
Atatus: Python Performance Monitoring
Atatus is an Application Performance Management (APM) solution that collects all requests to your Python applications without requiring you to change your source code. However, the tool does more than just keep track of your application's performance.
Monitor logs from all of your Python applications and systems into a centralized and easy-to-navigate user interface, allowing you to troubleshoot faster using Python monitoring.
We give a cost-effective, scalable method to centralized Python logging, so you can obtain total insight across your complex architecture. To cut through the noise and focus on the key events that matter, you can search the logs by hostname, service, source, messages, and more. When you can correlate log events with APM slow traces and errors, troubleshooting becomes easy.
#1 Solution for Logs, Traces & Metrics
![]() APM
APM
![]() Kubernetes
Kubernetes
![]() Logs
Logs
![]() Synthetics
Synthetics
![]() RUM
RUM
![]() Serverless
Serverless
![]() Security
Security
![]() More
More
