Creating an AWS Lambda Function using Python
AWS Lambda is a serverless compute service that enables you to run code without the need to provision or manage servers. This makes it an ideal choice for developers aiming to build scalable and efficient applications with minimal infrastructure overhead.
We are going to focus on two things in this article:
- First, we'll demonstrate how to create a Lambda function by directly uploading a JSON file into the Lambda inline code editor. Then we'll run a test to validate its functionality, showcasing a straightforward method ideal for quick development and testing.
- Next, we'll explore a more advanced use case: setting up a Lambda function to automatically execute when specific events occur within a CSV file uploaded to an S3 bucket. This approach highlights the event-driven capabilities of AWS Lambda, allowing for seamless data processing triggered by file uploads.
These examples will help you understand how to effectively leverage AWS Lambda monitoring for various scenarios, whether you are simply invoking a Lambda function from any file or integrating it with other AWS services.
Using AWS Lambda, developers can run Python code without the need to manage servers, which makes monitoring essential to ensure applications function as expected. Effective AWS Lambda Python monitoring is crucial for maintaining smooth operations, quickly identifying performance bottlenecks, and proactively resolving any issues that arise within the function. In this way, you can build more resilient serverless architectures.
Table Of Contents:
- What is AWS Lambda?
- Method 1: Creating and Configuring an AWS Lambda Function
- Create a Function
- Configure the Function
- Understanding the Lambda Console
- Writing and Deploying the Python Code
- Validating Function Execution
- Method 2: Using AWS S3 with Lambda
- Create a S3 Bucket
- Create an IAM Role
- Create Lambda Function with S3 Triggers Enabled
- Configuring the S3 Trigger
- Add the Python code to Lambda function console
- Monitoring Lambda Functions
What is AWS Lambda?
Amazon Lambda is one of the many components in the Amazon Web Services cloud. Lambda allows you to write any code without having to have all the other components usually required to deploy and test a code. AWS Lambda functions are executed within dynamically provisioned containers, managed by AWS. These containers scale up or down in response to changes in incoming traffic, ensuring optimal resource utilization.
AWS Lambda is considered efficient because Amazon takes care of servers, platforms, virtual machines etc and you will only have to focus on only your code. This makes the whole process of deployment very easy. You can write an entire lambda function, configure it and run it all in a couple of minutes. The best part of course is that you are charged only for the time you compute, i.e., you are charged only for the time your code is being executed.
When you take a look at the pricing structure, you can also see that the first one million requests are absolutely free.
Although AWS Lambda is called serverless, it doesn't mean that it is running without a server. It is still running on a server somewhere (here, within AWS), just that it is not your server.
Earlier, when you had to host an application, you needed all the infrastructure, including the server with yourself to do so. But now with all the advancement in technology, we are able to host applications without the need of any actual infrastructure. When you let go of servers from your infra stack, you are going serverless.
This streamlines application deployment, reduces operational overhead, enhances scalability and improves cost efficiency.
Lambda functions are usually triggered by these events:
- Changes in data stored in Amazon S3 buckets.
- Updates to records in Amazon DynamoDB tables.
- Incoming messages on Amazon Simple Notification Service (SNS) topics.
- HTTP requests via Amazon API Gateway.
- Custom events generated by AWS services or your own applications using AWS SDKs.
Uses of Lambda Functions:
- Executing code in response to all these events listed above.
- To build serverless applications.
- To change and scale individual functions as different microservices.
- Stream data in real-time from Amazon kinesis and DynamoDB systems.
- Handle all other asynchronous tasks like background processing and batching jobs
Method 1: Creating and Configuring an AWS Lambda Function
1. Create a Function
- Log in to your AWS account at AWS Management Console.
- Navigate to the AWS Lambda service by searching for "Lambda" in the services search bar.
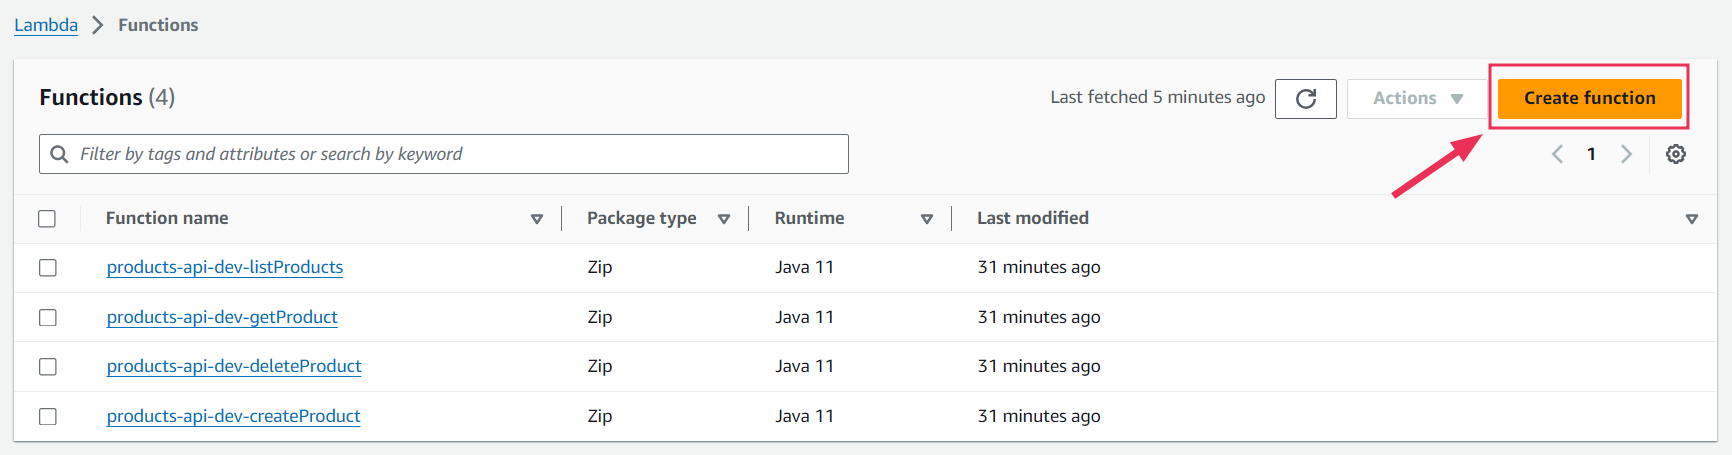
- Click the “Create a Function” button located on the top right corner of the Lambda dashboard.
This brings us to the next screen of Function creation, we have to configure a few things here, which include:
- Author from Scratch
- Function Name
- Runtime
2. Configure the Function
Function Name and Runtime language
- Enter a unique and descriptive name for your function (e.g.,test_function).
- Select the programming language runtime for your function. AWS Lambda supports various languages like Node.js, Java, Go, .NET, and Ruby. For this example, choose Python 3.8.

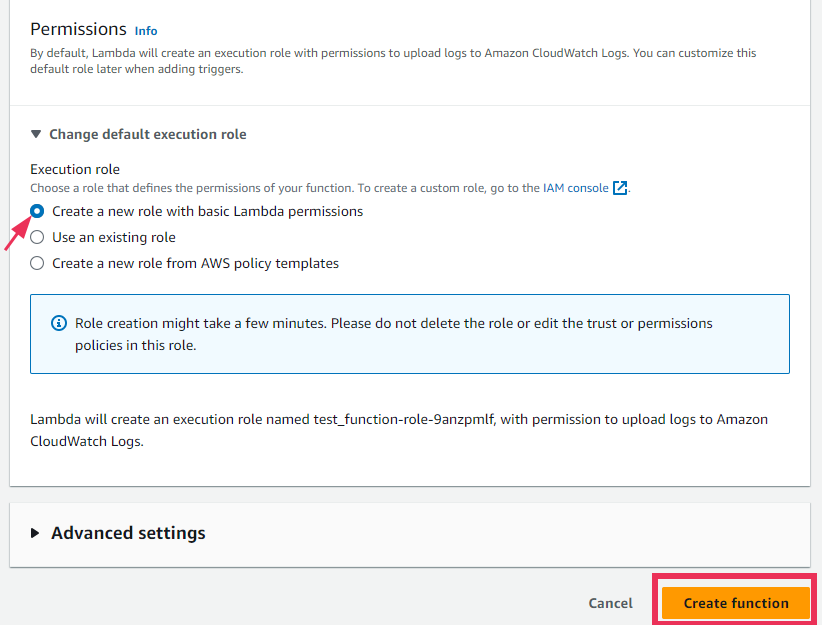
Permissions
- By default, Lambda will create a basic execution role with permissions to write logs to CloudWatch. This role will have minimal permissions required to execute the function and log output.
- You can customize this role later to add more permissions if your function needs to interact with other AWS services (e.g., S3, DynamoDB).
- Click the “Create Function” button to proceed.
3. Understanding the Lambda Console
After creating the function, you will be taken to the Lambda function configuration page. This page consists of several sections:
Designer View - The Designer view provides a visual representation of your Lambda function, showing the function itself, any triggers, and resources it has access to. You can add triggers from various AWS services to invoke your function in response to specific events.
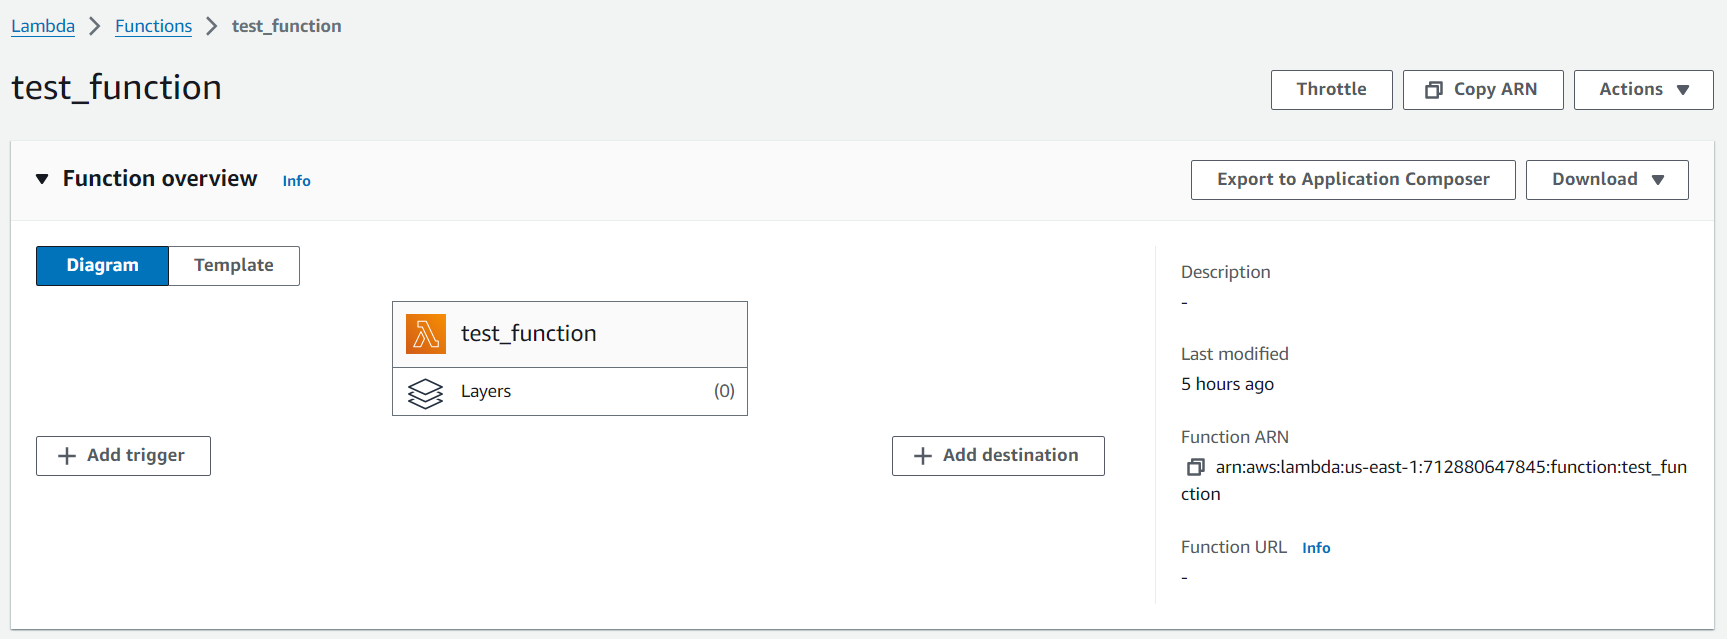
If you have added any triggers like API Gateway or CloudWatch Logs, it will show in this dashboard.
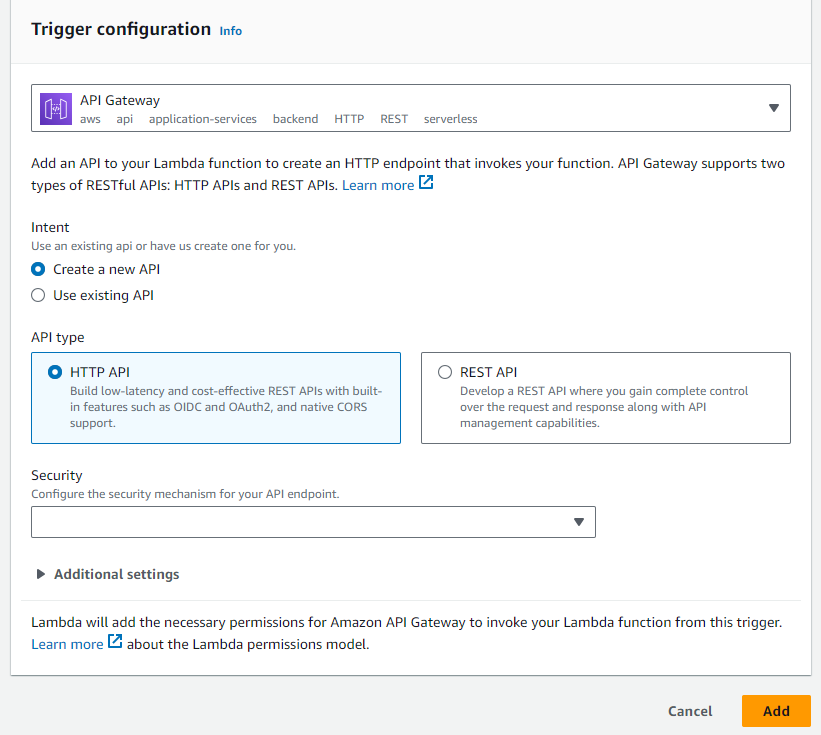
Triggers:
- Triggers are events that automatically invoke your Lambda function. For example, you can set up an API Gateway to trigger your function via HTTP requests, or configure an S3 bucket to trigger the function when a file is uploaded.
- To add a trigger, click “Add Trigger,” select the desired service, configure the event source, and save the changes.
Below the name of your lambda function, you can see the “layers” section. This layer allows you to add additional dependencies, or frameworks which are required for your function to use. One good thing about Lambda is that we don’t have to keep anything locally to install those dependencies as layers.
This concludes the function overview section. Below this section is the place where the actual work gets done: the function code section. In the section, if you don't want to write code manually, you can directly upload a zip file.
4. Writing and Deploying the Python Code
The function code section has a few options - Code, Test, Monitor, Configuration, Aliases, and Version. Here’s a breakdown of how you can make each option work:
- Function Code - The Function Code section is where you write, upload, and manage your function’s code. You can write code directly in the built-in editor, upload a ZIP file containing your code, or specify a location in an S3 bucket.
- Test - Test console is where you can validate that your function works as expected.
- Monitor - The Monitor tab provides access to CloudWatch logs and metrics. You can view log output, monitor aws lambda function performance, and analyze metrics like invocation count, duration, and errors.
- Configuration - You can configure settings such as memory allocation, timeout duration, environment variables, and more in the configuration option.
- Aliases and Versions - Aliases are pointers to specific versions of your function. They make it easy to manage and switch between different versions, facilitating smooth deployments and rollbacks.
Example Function
Now we will check how a code works.
We are using an example function which takes a list of numbers from the events, calculates the sum, average, maximum and minimum values and returns these values.
import json

def lambda_handler(event, context):
    # Extract numbers from the event
    numbers = event.get('numbers')

    if not numbers or not isinstance(numbers, list):
        return {
            'statusCode': 400,
            'body': json.dumps('Invalid input: Please provide a list of numbers')
        }

    # Calculate statistics
    total = sum(numbers)
    count = len(numbers)
    average = total / count
    maximum = max(numbers)
    minimum = min(numbers)

    # Create the response
    response = {
        'sum': total,
        'average': average,
        'maximum': maximum,
        'minimum': minimum
    }

    return {
        'statusCode': 200,
        'body': json.dumps(response)
    }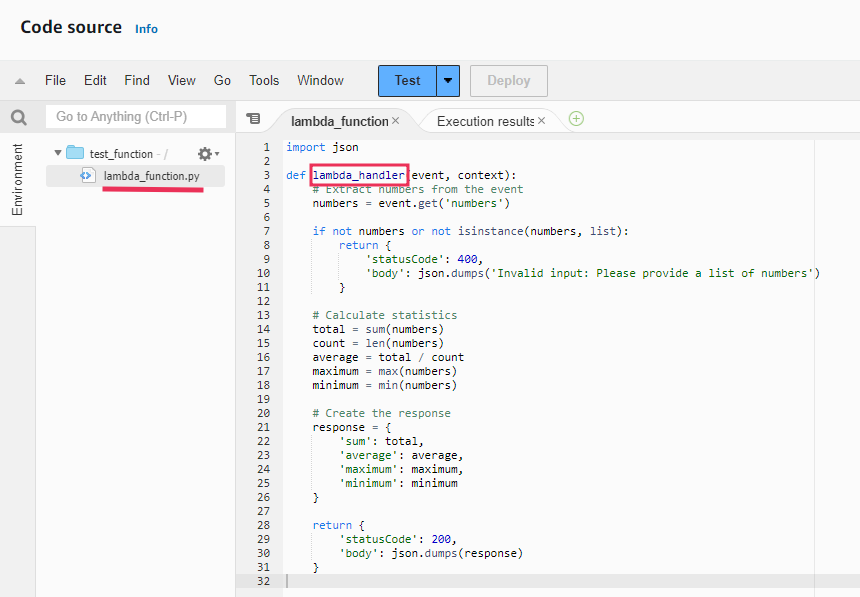
The code above imports JSON Python package and defines a function named lambda_handler. This function entry point is defined in the Handler and it takes two parameters, ‘event’ and ‘context’. These parameters are automatically defined by AWS when the function is invoked.
Note on Handler Function
The handler function is crucial for AWS Lambda to know which function to execute. The format for the handler field is filename.handler_name. By default, lambda will set lambda_function.lambda_handler as the name for a function handler. But if you want to change it, open the Function page in your Lambda console, navigate to code tab and edit in the runtime settings. In the handler, enter the new name and click on save.
Important: Ensure that the file name and function name are correctly referenced in the handler field. If you change the file name or function name, make sure to update it otherwise you might face errors while executing.
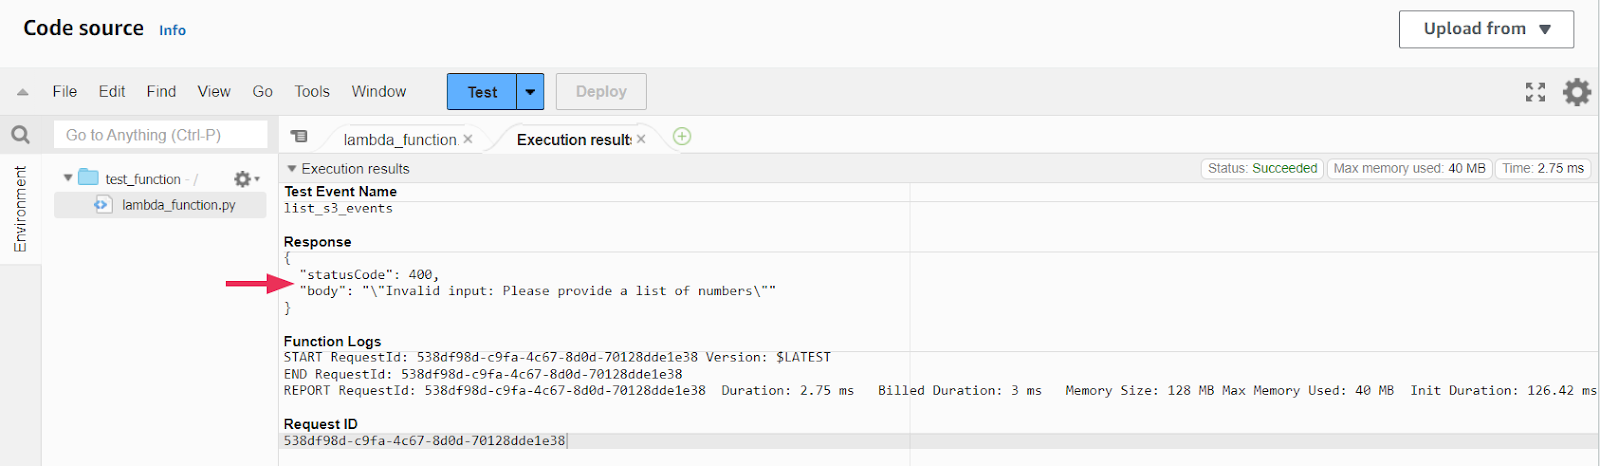
If your input event includes a JSON file with the ‘numbers’ key, it will return a 200-code response with all the statistics. However, if you do not have the proper event it will return a 400 status code.
5. Validating Function Execution
When you run your Lambda function, whether the statistical calculations are correct or not, the key indicator of a successful function execution is the status. In the AWS Lambda console, you will see a status message on the top right corner of the execution results.
If the function executed properly, you will see a ‘SUCCEEDED’ status. This indicates that the function ran without any errors and completed its execution as expected.
Method 2: Using AWS S3 with Lambda
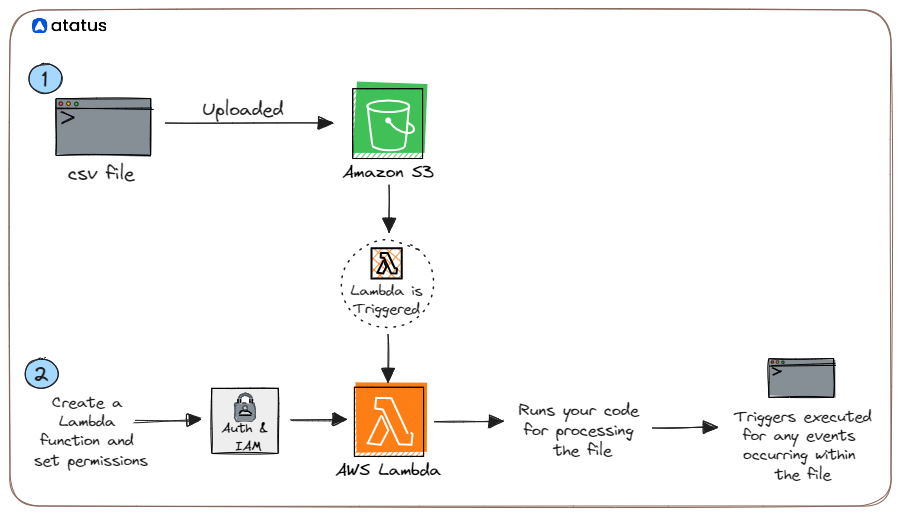
In the previous section, we saw how to invoke a Lambda function for a Python file by directly testing the code in the Lambda console. Now, we will take it a step further by configuring triggers so that the Lambda function is automatically invoked in response to events occurring within a linked S3 bucket.
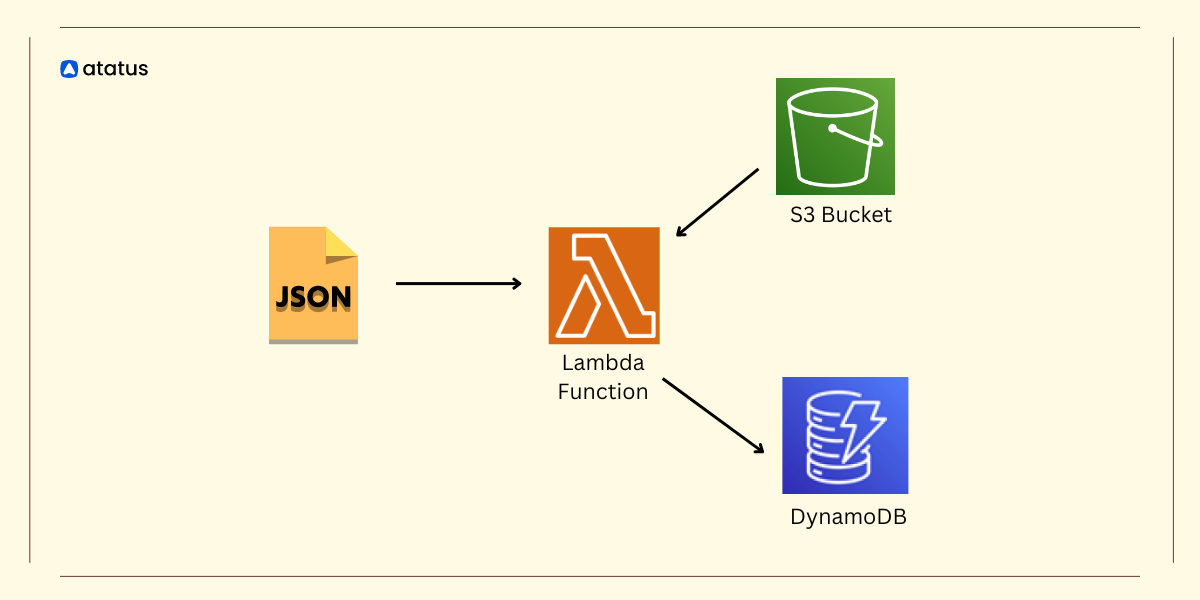
This is a pictorial representation of what we are going to do with our AWS Lambda Python application using an S3 trigger.
To get started with the process, you need to first:
- Create a S3 Bucket
- Create an IAM role and assign required permissions
- Create Lambda Function with S3 Triggers enabled
- Configure the S3 Trigger
- Add the Python code to Lambda function console
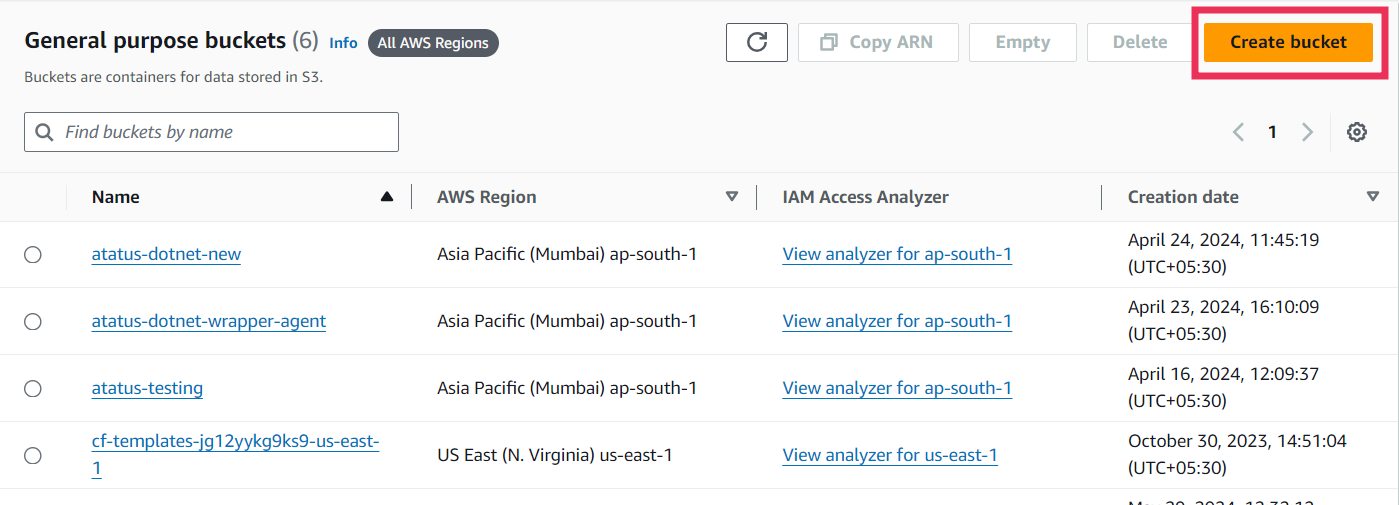
i.) Create a S3 Bucket
To read a file from the s3 bucket, navigate to the s3 service console and create a new bucket. Give it a name and configure the other settings as we did before. If you already have files stored in your S3 buckets you can directly use them.
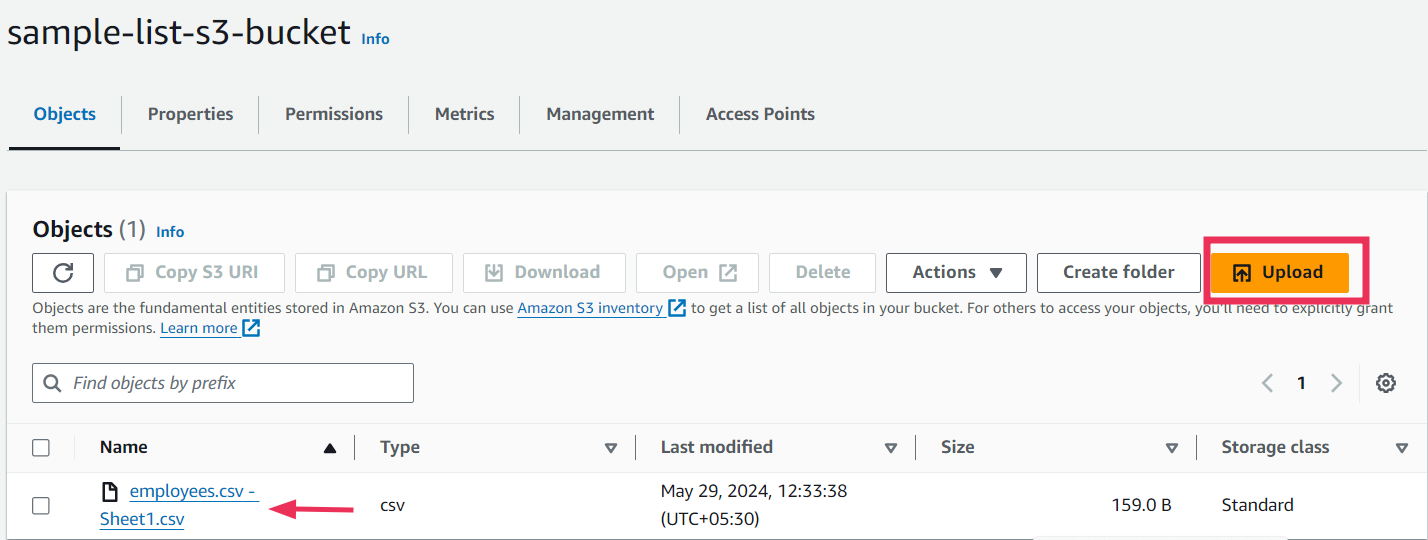
To get started with a sample file, we are going to upload a simple csv file here. This file contains names, employee ID, of ten different employees. Save this file as ‘employees.csv’ and add it to your s3 bucket.
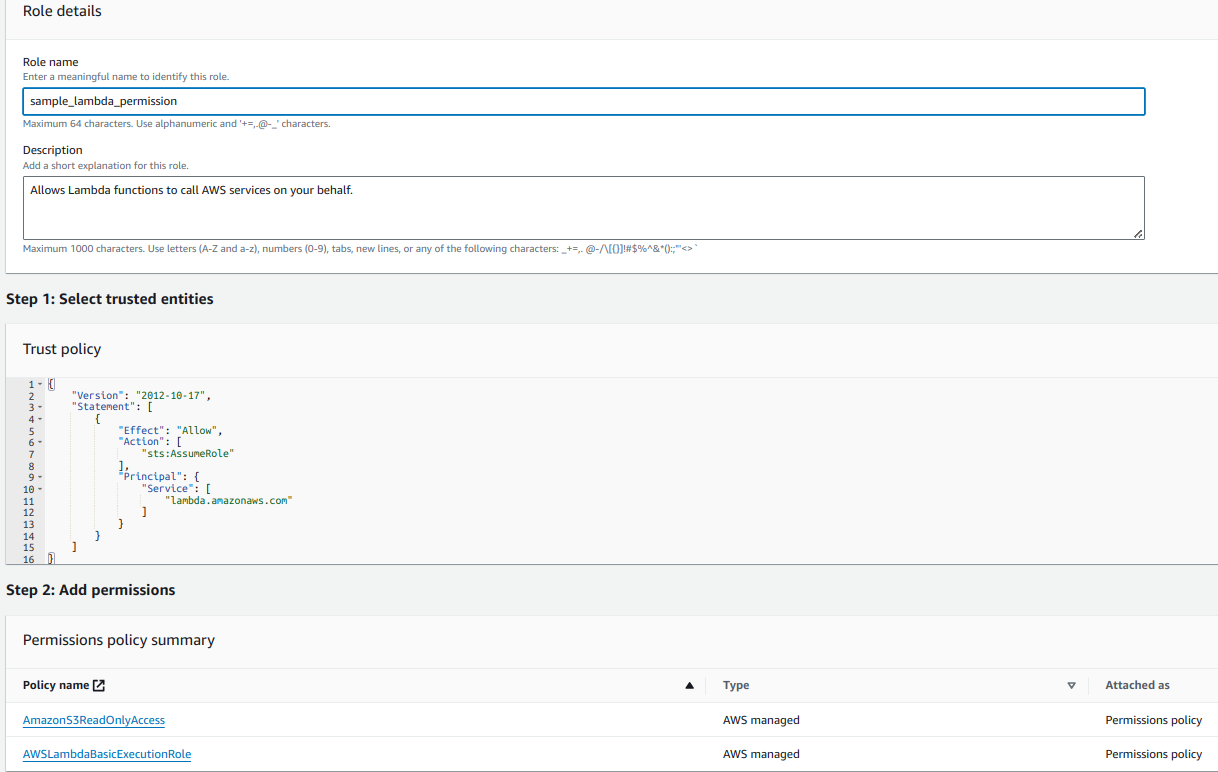
ii.) Create an IAM Role
The next step is to create an IAM role. This IAM will facilitate lambda function to access S3 buckets and AWS CloudWatch Logs.
Within the IAM console click on the Create role and select Lambda as the service that will use this role. Attach policies that grant permission to access S3, Lambda and Cloudwatch Logs.
For this service we need these two permissions:
- AmazonS3ReadOnlyAccess
- AWSLambdaBasicExecutionRole
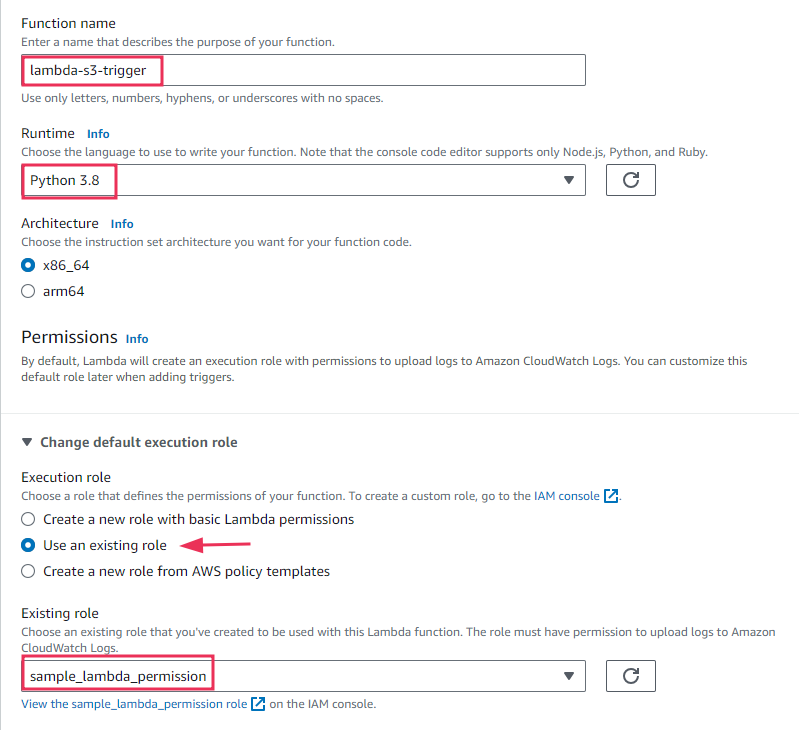
iii.) Create Lambda Function with S3 Triggers Enabled
Use the same procedure we followed in the first part to create a Lambda function. Now, you must make a small change in the permission section here. In the earlier part we just created a new role with basic lambda permissions but for here, we will change this to "use an existing role". Then consequently set a role name that you created previously (lambda-s3-trigger) in the IAM role.
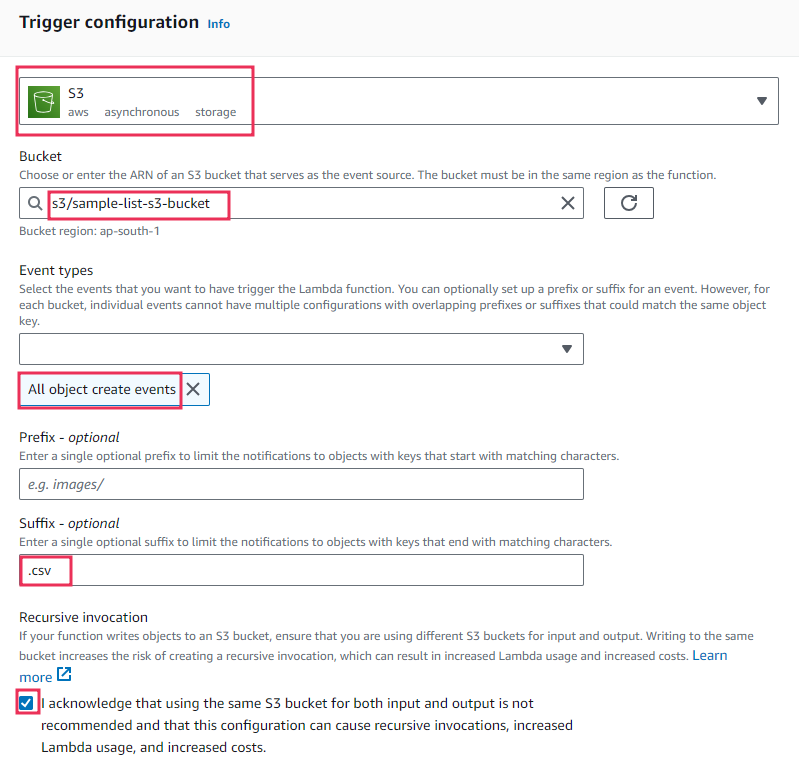
iv.) Configuring the S3 Trigger
To set up an S3 trigger for your Lambda function, follow these steps:
- Click on "Add Trigger" in your Lambda function configuration.
- Select S3 from the list of available triggers.
- Enter the name of the S3 bucket you created earlier.
- Select the event types you want to trigger the Lambda function. In this example, choose "All object create events."
- In the suffix option, enter
.csvto trigger the Lambda function only for events related to.csvfiles. - Carefully read the description and acknowledge the configuration to avoid recursive triggers.
By choosing "All object create events," your Lambda function will be triggered for any object creation events in the specified S3 bucket. Adding .csv as a suffix filter ensures that only events related to .csv files will trigger the function, preventing unnecessary invocations. Carefully review the description before acknowledging to avoid creating a recursive process that could lead to unintentional continuous triggers.
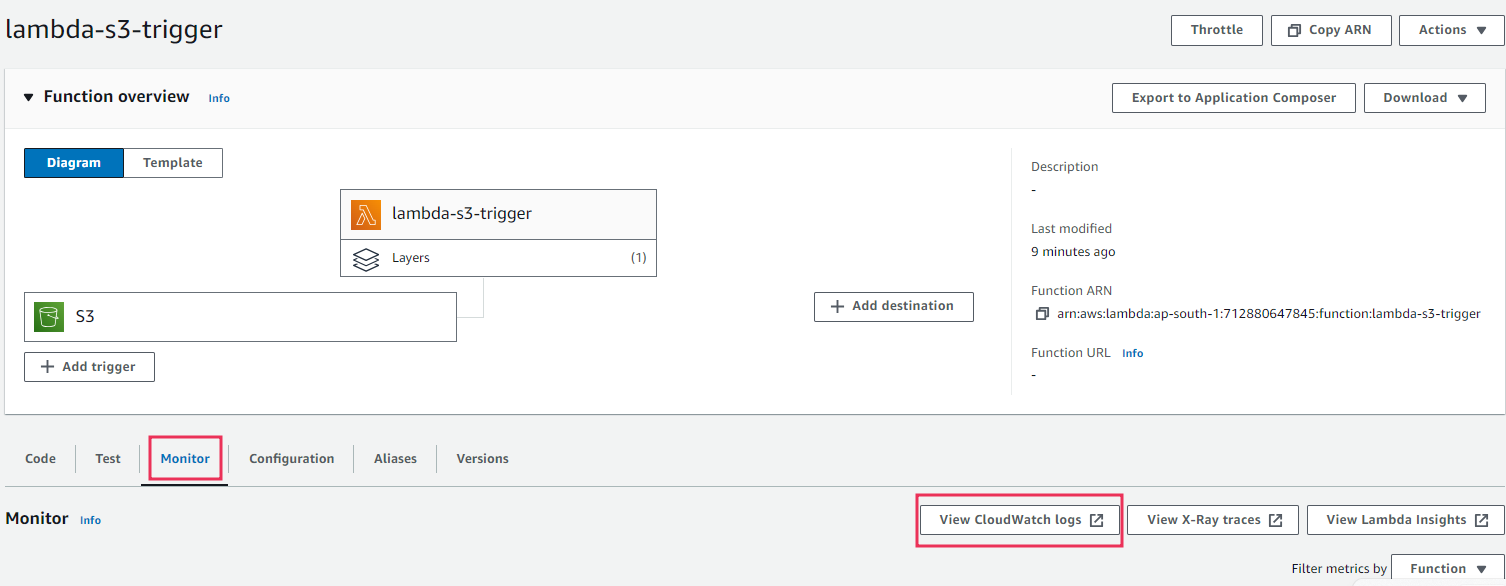
Now when you click on the add button, you will be able to see triggers set for S3 in the function overview page.
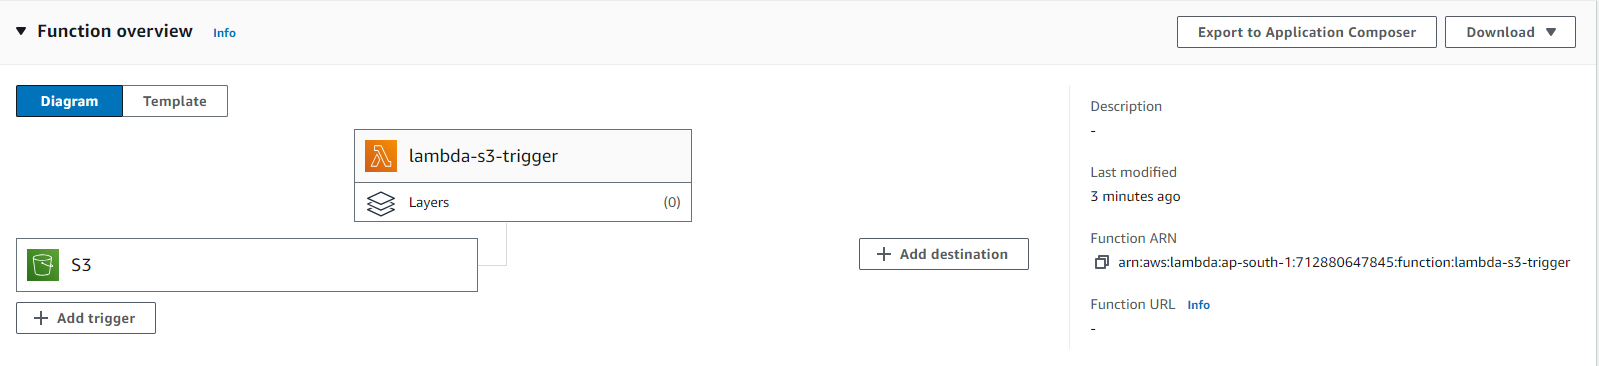
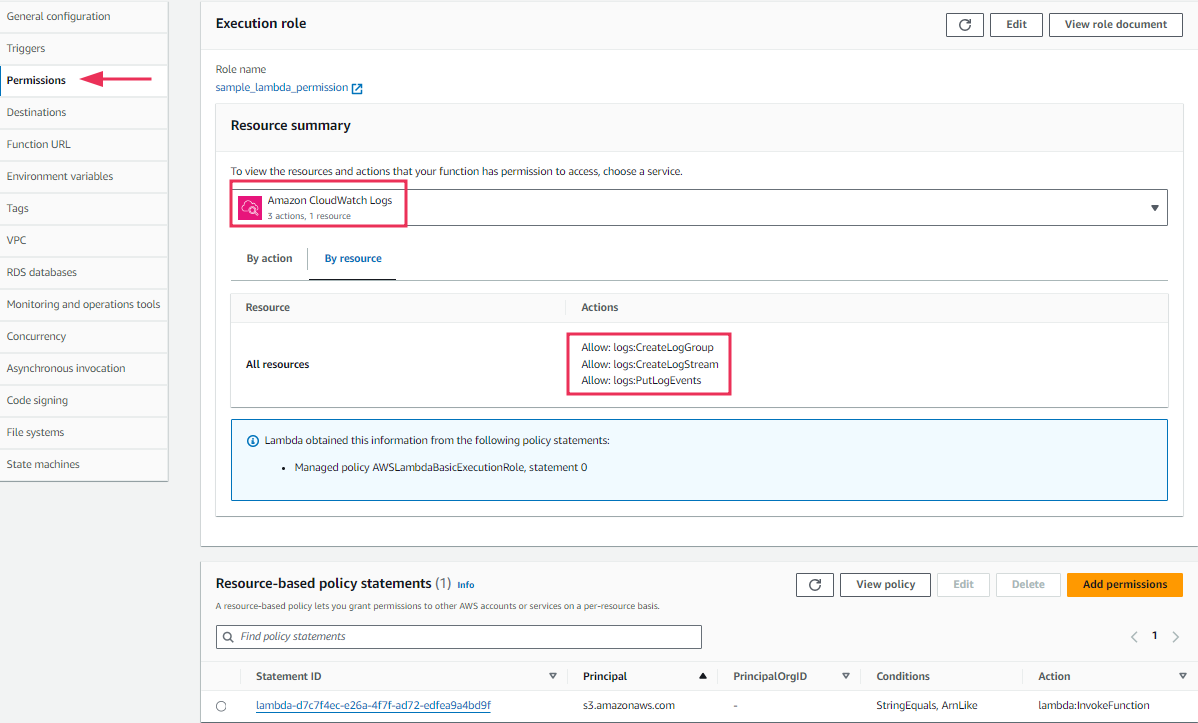
You can check if the S3 bucket contains the .csv file we added earlier. Further within the configuration, you can look into the permissions for this particular bucket. We've enabled AWS CloudWatch to capture all logs related to events happening within this bucket and it is allowed to create a log group, a log stream, and pull all log events.
v.) Add the Python code to Lambda function console
Now go back to the Lambda console page, and within the "Code" section, add the Python script we have provided below.
import json
import boto3
import io
from io import StringIO
import pandas as pd

s3_client = boto3.client('s3')

def lambda_handler(event, context):
    try:
        s3_Bucket_Name = event["Records"][0]["s3"]["bucket"]["name"]
        s3_File_Name = event["Records"][0]["s3"]["object"]["key"]

        object = s3_client.get_object(Bucket=s3_Bucket_Name, Key=s3_File_Name)
        body = object['Body']
        csv_string = body.read().decode('utf-8')
        dataframe = pd.read_csv(StringIO(csv_string))

        print(dataframe.head(3))

    except Exception as err:
        print(err)

    # TODO implement
    return {
        'statusCode': 200,
        'body': json.dumps('Hello from Lambda!')
    }
(Here, you must be aware of Boto3. Boto3 is a python SDK which allows developers to write software where they use files from Amazon S3 and EC2.)
When you deploy this code and run the test, it will produce a failed execution status. Don't fret! You just need to make some simple configuration changes.
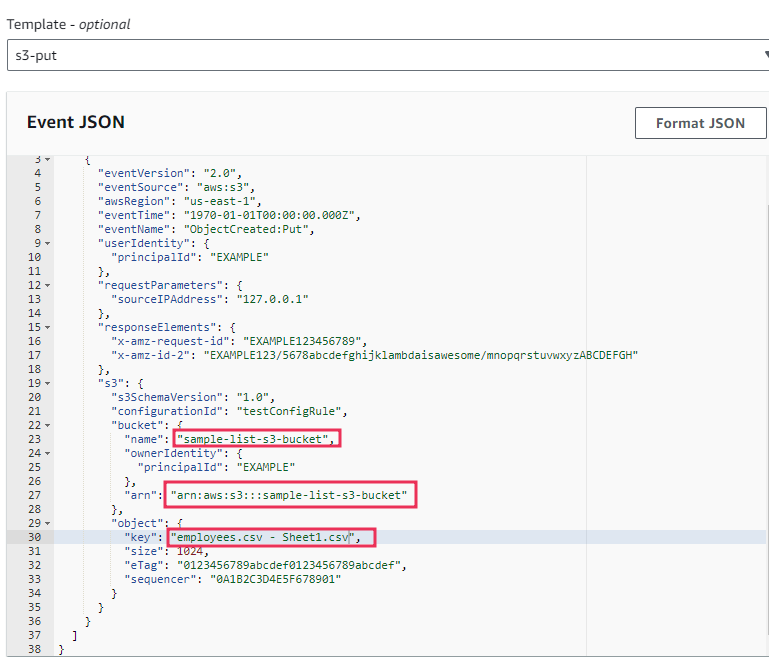
When you do that, configure the test event with a new event name (s3-test-event), change the event sharing settings to private and make the following changes in the test code:
- Replace S3 bucket name with your bucket name.
- Replace arn.
- Replace object key with your test file name.
In the Python code provided earlier, we are importing the Pandas library. Pandas is particularly useful for integrating and moving data between AWS services and performing analytics, especially when handling large datasets. However, since Pandas was not initially added as a layer, the Lambda function execution failed.
To resolve this, we need to add the Pandas layer to our Lambda function.
- Navigate to the "Layers" section in your Lambda function configuration.
- Select the layer named
AWSSDKPandas-Python38. - Choose the appropriate version of the Pandas layer.
- Click "Add" to attach the layer to your Lambda function.
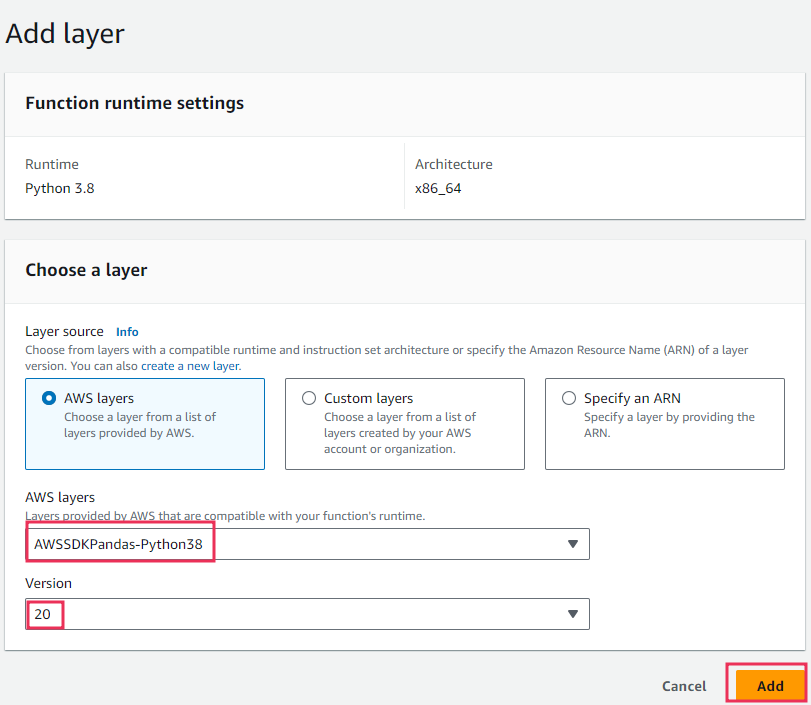
By adding the Pandas layer, you ensure that the necessary dependencies are included, allowing your Lambda function to execute successfully and leverage Pandas for efficient data processing and analytics.
Now when you run this test again, it will give a successful output:
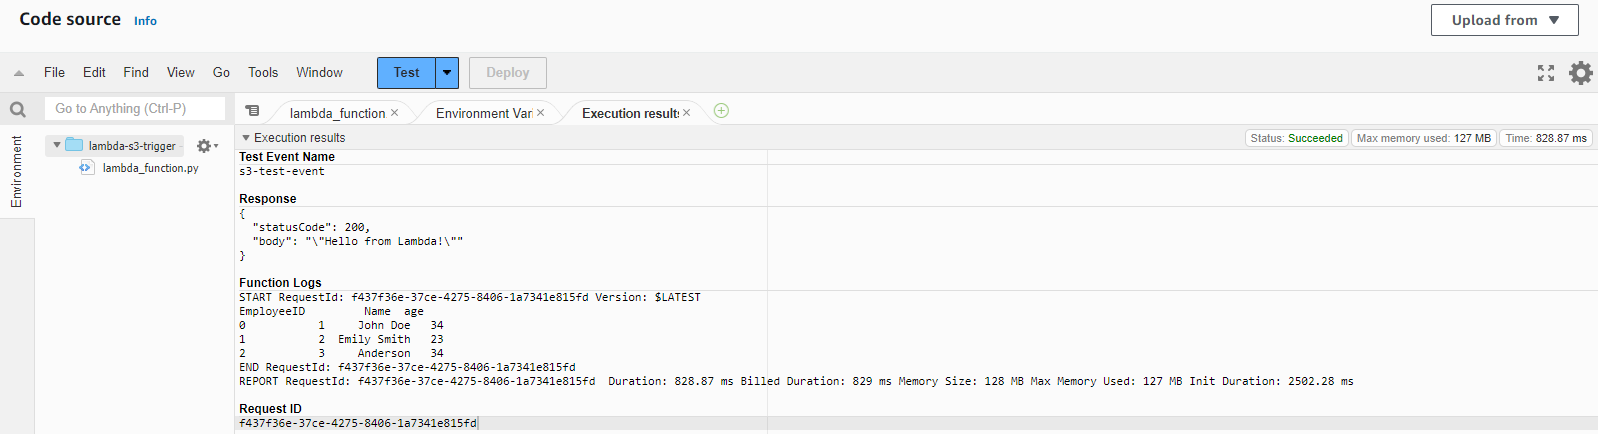
The data within our sample file is displayed in the results section.
Monitoring Lambda Functions
Monitoring is not just about detecting issues reactively but also about proactively managing and optimizing your systems. It's a critical aspect of building and maintaining successful serverless infrastructure (since we are dealing with serverless here) to deliver reliable and high-performing applications.
As you saw in this tutorial, Lambda captures various metrics - starting from invocations, error counts, duration to concurrent executions and more. AWS provides two main methods for monitoring these Lambda functions: CloudWatch Logs and CloudWatch Metrics.
- CloudWatch Logs captures and stores log data generated by Lambda function and allows you to view, search, and analyze logs in real-time. You can use CloudWatch Logs to identify errors, track invocations, and monitor execution duration.
- CloudWatch Metrics provides predefined metrics like invocation count, execution duration, and error count, all of which are automatically collected and aggregated by Lambda. You can create alarms based for these metrics to visualize metrics using charts.
Using CloudWatch Logs to monitor data
Since we have given permission for CloudWatch while creating our Lambda function, once the function is executed, the events will be automatically logged in CloudWatch. To view data in logs, click on the monitor section within the lambda console and select View CloudWatch logs.
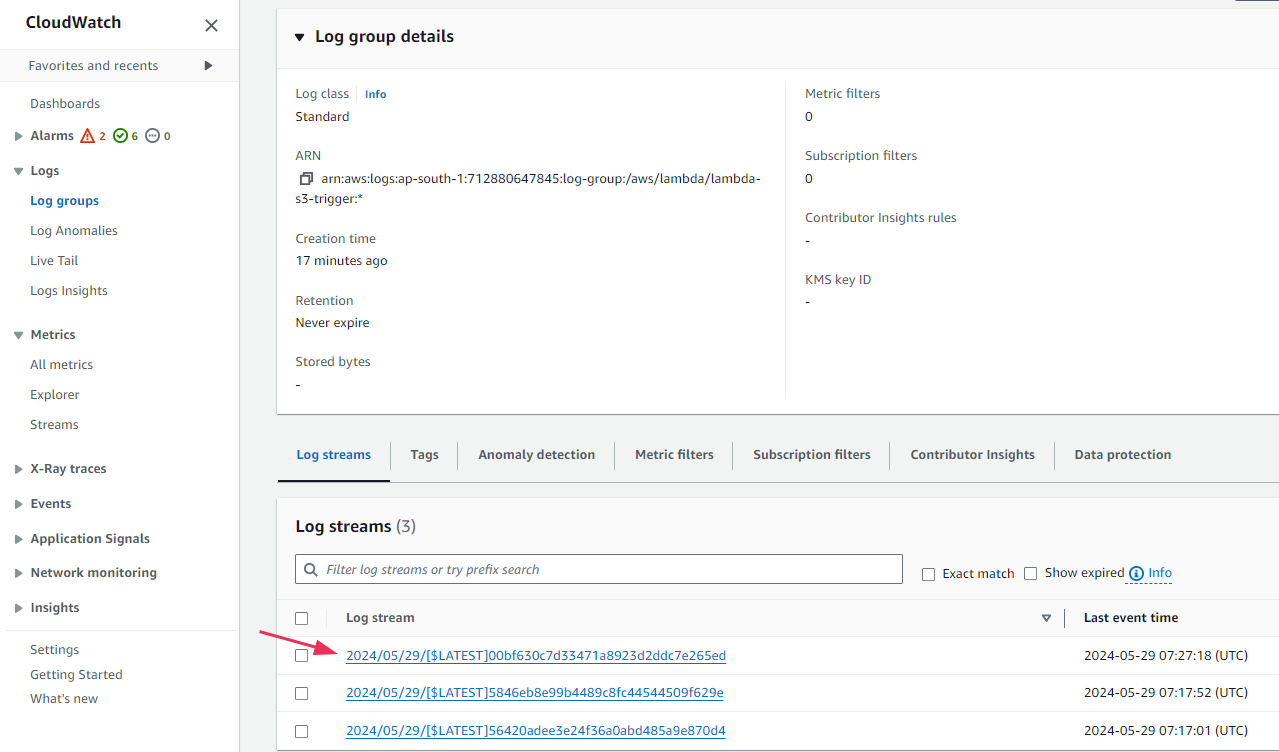
Select one of the log streams. Each log stream corresponds to an individual invocation of your Lambda function. When you click on the latest individual logs from here, you will be able to view all the logs related to that particular event.
View all the individual events as logs. You can expand each log and see the detailed message as well.
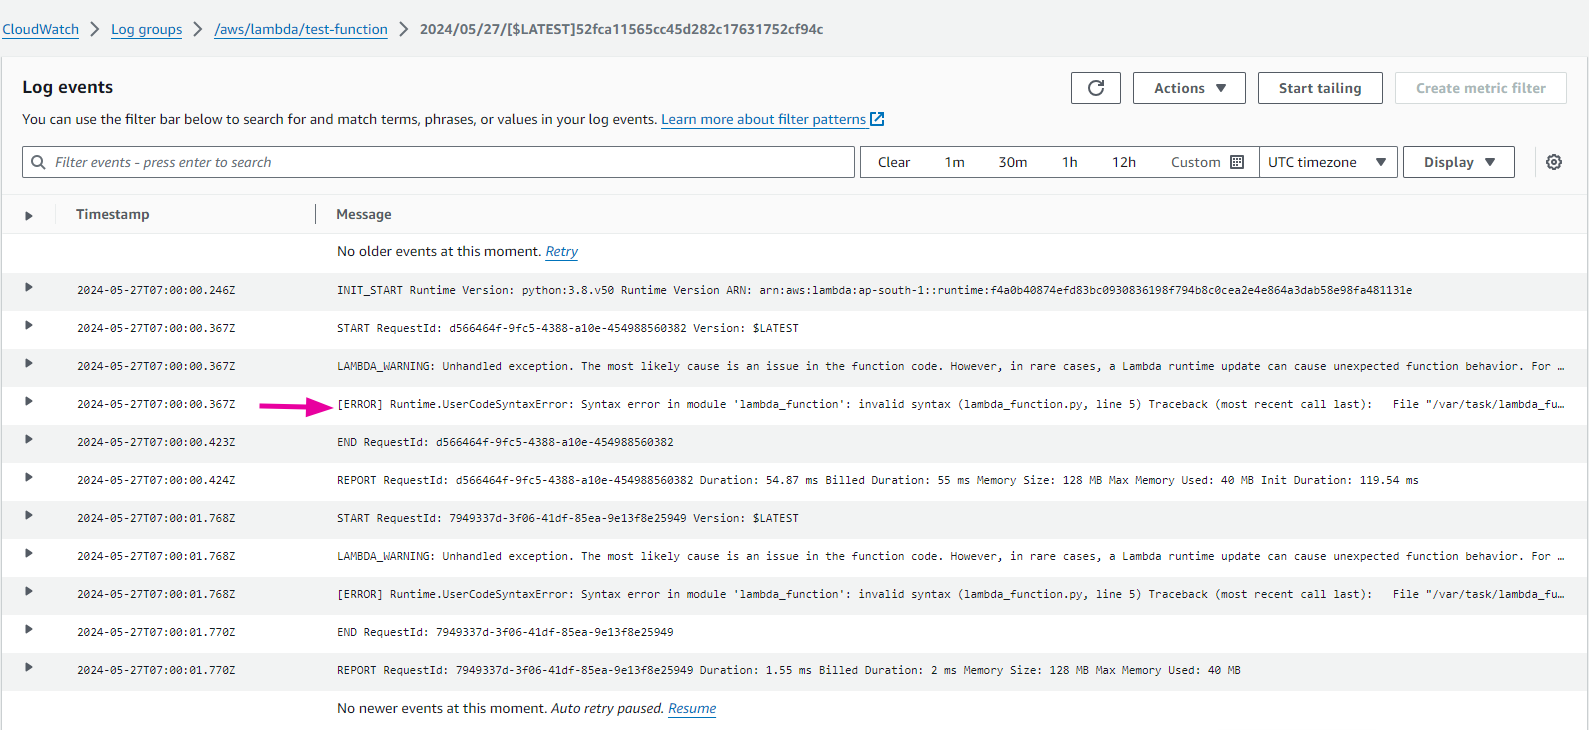
In this log stream, you can view detailed information on the function’s execution. The details will include information on start and end times, request ID, any outputs from your function and even error messages.
Using CloudWatch Metrics to monitor data
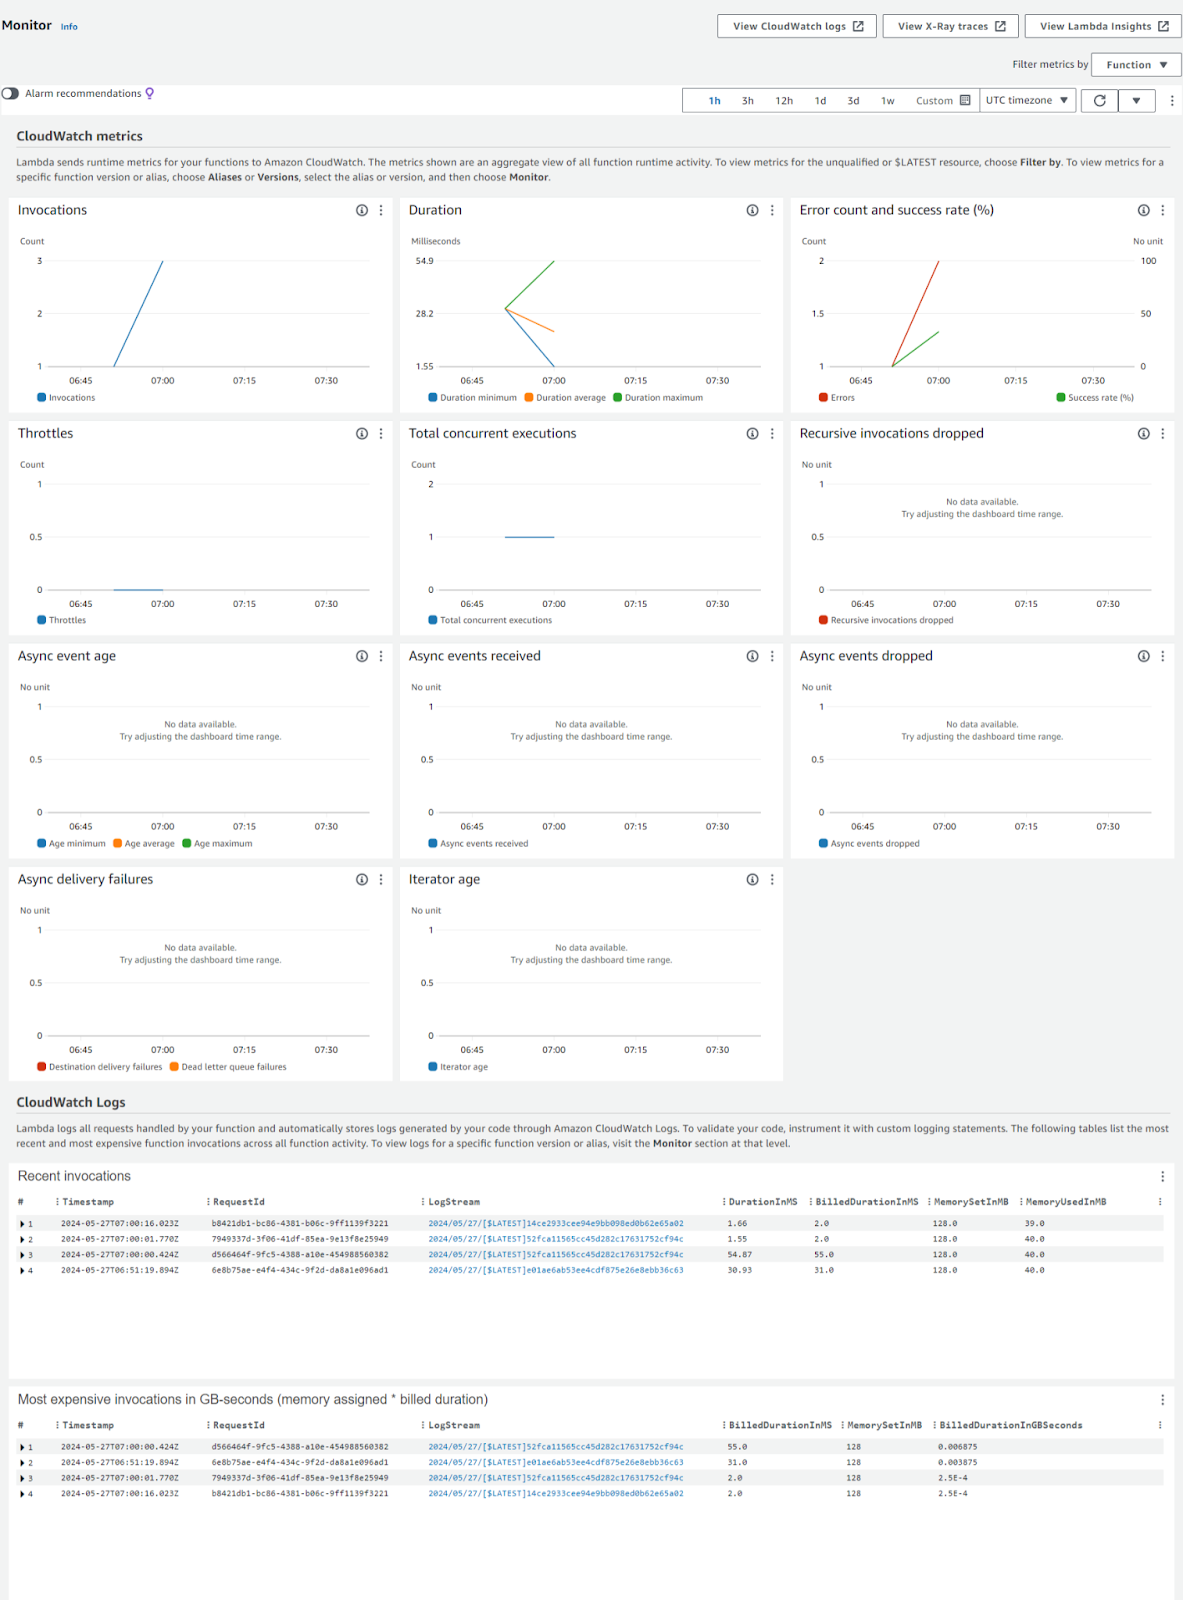
Lambda reports certain metrics directly to the CloudWatch service, which do not appear in the logs section. With CloudWatch, you can create alarms to monitor these metrics and receive notifications whenever a metric exceeds a specified threshold. Additionally, CloudWatch provides the capability to visualize these metrics in charts, offering a comprehensive view of your Lambda function's performance beyond just log data.
When you run a test code, and click on the Monitor option in Lambda console, you can view all these metrics displayed as charts.
To Summarize:
AWS Lambda is a serverless compute service that allows you to run code without provisioning or managing servers. In this blog tutorial, we saw how to set up a Lambda function, saw it executing on a simple JSON file, and then invoking on a file present within the S3 bucket.
- We first created a Lambda function by directly uploading a JSON file containing the function code and testing it in the console itself.
- In the next section, we set up a Lambda function to execute in response to events occurring within a CSV file uploaded to an S3 bucket.
- To do this, we first created an S3 bucket and added a sample CSV file to it.
- Followed by creating an IAM role and granting the necessary permissions - read only access for S3 and basic execution access for Lambda.
- Then we configured the S3 bucket to trigger the Lambda function whenever a new object was created or modified, specifically targeting CSV files (here)
- We saw the function executing successfully and being invoked whenever relevant events occurred.
Serverless Monitoring with Atatus
Atatus offers a robust serverless monitoring feature designed to seamlessly integrate with AWS Lambda, empowering developers with comprehensive insights into their serverless applications. By leveraging Atatus alongside AWS Lambda, developers can attain full visibility across all facets of their serverless infrastructure.
This integration enables the consolidation of real-time metrics, logs, and traces from Lambda functions, providing holistic insights into performance, resource utilization, and error occurrences. Monitoring execution in response to various events, including HTTP requests, database changes, file uploads, and scheduled triggers, becomes effortless with Atatus.
Notably, Atatus Serverless Monitoring extends its support to multiple platforms, including Node.js, Python and Java. This versatility proves invaluable, especially when utilizing Python to develop Lambda functions that interact with various AWS services such as S3 and DynamoDB – a scenario demonstrated in this tutorial.
With Atatus, developers can effectively monitor, analyze, and optimize their serverless applications, ensuring their reliability and performance meet the highest standards.
Try your 14-day free trial of Atatus.
#1 Solution for Logs, Traces & Metrics
![]() APM
APM
![]() Kubernetes
Kubernetes
![]() Logs
Logs
![]() Synthetics
Synthetics
![]() RUM
RUM
![]() Serverless
Serverless
![]() Security
Security
![]() More
More